部署环境使用Rocky Linux 9.4。
- 提示:
- 示例代码仅供参考,需依据实际运行环境与路径做出相应修改!
- 文中代码与链接可能因时间推移或不可抗力失效,请结合实际环境运行调试!
- 如需转载或借鉴,请注明出处并附上本文博客链接!
首先更新软件包:sudo dnf update -y
[ninebytes@localhost ~]$ sudo dnf update -y
Rocky Linux 9 - BaseOS                                                                     1.6 MB/s | 4.1 kB     00:00
Rocky Linux 9 - AppStream                                                                  1.7 MB/s | 4.5 kB     00:00
Dependencies resolved.
Nothing to do.
Complete!
由于OpenClaw依赖于Node.js,所以我们先来安装Node.js。
下载并执行NVM v0.40.3的安装脚本:curl -o- https://raw.githubusercontent.com/nvm-sh/nvm/v0.40.3/install.sh | bash
若github拉取慢或访问不了,可以使用我转载的install_v0.40.3.sh文件:curl -o- https://blog.ninebytes.top/nvm-sh/install_v0.40.3.sh | bash
[ninebytes@localhost ~]$ curl -o- https://raw.githubusercontent.com/nvm-sh/nvm/v0.40.3/install.sh | bash
  % Total    % Received % Xferd  Average Speed   Time    Time     Time  Current
                                 Dload  Upload   Total   Spent    Left  Speed
100 16631  100 16631    0     0    758      0  0:00:21  0:00:21 --:--:--  3637
=> Downloading nvm as script to '/home/ninebytes/.nvm'

=> Appending nvm source string to /home/ninebytes/.bashrc
=> Appending bash_completion source string to /home/ninebytes/.bashrc
=> Close and reopen your terminal to start using nvm or run the following to use it now:

export NVM_DIR="$HOME/.nvm"
[ -s "$NVM_DIR/nvm.sh" ] && \. "$NVM_DIR/nvm.sh"  # This loads nvm
[ -s "$NVM_DIR/bash_completion" ] && \. "$NVM_DIR/bash_completion" # This loads nvm bash_completion然后临时加载NVM到当前终端会话中,让你能立即使用NVM命令则无需重启终端:\. "$HOME/.nvm/nvm.sh"
[ninebytes@server ~]$ \. "$HOME/.nvm/nvm.sh"
``` bash
若想永久生效,需把这句命令添加到Shell配置文件中:`echo '\. "$HOME/.nvm/nvm.sh"' >> ~/.bashrc && source ~/.bashrc`
下载编译并安装Node.js 24.x最新版,同时会配套安装对应的NPM:nvm install 24
[ninebytes@localhost ~]$ nvm install 24
Downloading and installing node v24.14.0...
Downloading https://nodejs.org/dist/v24.14.0/node-v24.14.0-linux-x64.tar.xz...
#################################################################################################################### 100.0%
Computing checksum with sha256sum
Checksums matched!
Now using node v24.14.0 (npm v11.9.0)
Creating default alias: default -> 24 (-> v24.14.0)使用:nvm ls列出通过NVM安装的所有Node.js版本,验证是否安装成功。
[ninebytes@localhost ~]$ nvm ls
->     v24.14.0
default -> 24 (-> v24.14.0)
iojs -> N/A (default)
unstable -> N/A (default)
node -> stable (-> v24.14.0) (default)
stable -> 24.14 (-> v24.14.0) (default)
lts/* -> lts/krypton (-> v24.14.0)
lts/argon -> v4.9.1 (-> N/A)
lts/boron -> v6.17.1 (-> N/A)
lts/carbon -> v8.17.0 (-> N/A)
lts/dubnium -> v10.24.1 (-> N/A)
lts/erbium -> v12.22.12 (-> N/A)
lts/fermium -> v14.21.3 (-> N/A)
lts/gallium -> v16.20.2 (-> N/A)
lts/hydrogen -> v18.20.8 (-> N/A)
lts/iron -> v20.20.1 (-> N/A)
lts/jod -> v22.22.1 (-> N/A)
lts/krypton -> v24.14.0然后来安装Git,OpenClaw不是必须依赖Git,但强烈建议安装:sudo dnf install -y git
[ninebytes@localhost ~]$ sudo dnf install -y git
······
Complete!验证Git:git --version
[ninebytes@localhost ~]$ git --version
git version 2.43.0安装OpenClaw:npm i -g openclaw --registry=https://registry.npmmirror.com --verbose
指定从阿里NPM仓库下载OpenClaw,并输出每一步的详细日志,若不想输出日志,去掉--verbose即可
[ninebytes@localhost ~]$ npm i -g openclaw --registry=https://registry.npmmirror.com --verbose
npm verbose cli /home/ninebytes/.nvm/versions/node/v24.14.0/bin/node /home/ninebytes/.nvm/versions/node/v24.14.0/bin/npm
npm info using npm@11.9.0
npm info using node@v24.14.0
npm verbose title npm i openclaw
npm verbose argv "i" "--global" "openclaw" "--registry" "https://registry.npmmirror.com" "--loglevel" "verbose"
npm verbose logfile logs-max:10 dir:/home/ninebytes/.npm/_logs/2026-03-21T04_09_46_213Z-
npm verbose logfile /home/ninebytes/.npm/_logs/2026-03-21T04_09_46_213Z-debug-0.log
npm http fetch GET 200 https://registry.npmmirror.com/openclaw 329ms (cache miss)
npm http fetch GET 200 https://registry.npmmirror.com/@agentclientprotocol%2fsdk 213ms (cache miss)
npm http fetch GET 200 https://registry.npmmirror.com/@grammyjs%2frunner 249ms (cache miss)
npm info run protobufjs@7.5.4 postinstall { code: 0, signal: null }
---省略1000多行输出日志---
added 539 packages in 2m

89 packages are looking for funding
  run `npm fund` for details
npm verbose cwd /home/ninebytes
npm verbose os Linux 5.14.0-427.13.1.el9_4.x86_64
npm verbose node v24.14.0
npm verbose npm  v11.9.0
npm verbose exit 0
npm info ok使用openclaw --version验证OpenClaw是否安装成功
[ninebytes@localhost ~]$ openclaw --version
OpenClaw 2026.3.13 (61d171a)然后使用openclaw onboard开始配置OpenClaw
[ninebytes@localhost ~]$ openclaw onboard

🦞 OpenClaw 2026.3.13 (61d171a) — I don't judge, but your missing API keys are absolutely judging you.

▄▄▄▄▄▄▄▄▄▄▄▄▄▄▄▄▄▄▄▄▄▄▄▄▄▄▄▄▄▄▄▄▄▄▄▄▄▄▄▄▄▄▄▄▄▄▄▄▄▄▄▄
██░▄▄▄░██░▄▄░██░▄▄▄██░▀██░██░▄▄▀██░████░▄▄▀██░███░██
██░███░██░▀▀░██░▄▄▄██░█░█░██░█████░████░▀▀░██░█░█░██
██░▀▀▀░██░█████░▀▀▀██░██▄░██░▀▀▄██░▀▀░█░██░██▄▀▄▀▄██
▀▀▀▀▀▀▀▀▀▀▀▀▀▀▀▀▀▀▀▀▀▀▀▀▀▀▀▀▀▀▀▀▀▀▀▀▀▀▀▀▀▀▀▀▀▀▀▀▀▀▀▀
                  🦞 OPENCLAW 🦞

┌  OpenClaw onboarding
│
◇  Security ─────────────────────────────────────────────────────────────────────────────────╮
│                                                                                            │
│  Security warning — please read.                                                           │
│                                                                                            │
│  OpenClaw is a hobby project and still in beta. Expect sharp edges.                        │
│  By default, OpenClaw is a personal agent: one trusted operator boundary.                  │
│  This bot can read files and run actions if tools are enabled.                             │
│  A bad prompt can trick it into doing unsafe things.                                       │
│                                                                                            │
│  OpenClaw is not a hostile multi-tenant boundary by default.                               │
│  If multiple users can message one tool-enabled agent, they share that delegated tool      │
│  authority.                                                                                │
│                                                                                            │
│  If you’re not comfortable with security hardening and access control, don’t run           │
│  OpenClaw.                                                                                 │
│  Ask someone experienced to help before enabling tools or exposing it to the internet.     │
│                                                                                            │
│  Recommended baseline:                                                                     │
│  - Pairing/allowlists + mention gating.                                                    │
│  - Multi-user/shared inbox: split trust boundaries (separate gateway/credentials, ideally  │
│    separate OS users/hosts).                                                               │
│  - Sandbox + least-privilege tools.                                                        │
│  - Shared inboxes: isolate DM sessions (`session.dmScope: per-channel-peer`) and keep      │
│    tool access minimal.                                                                    │
│  - Keep secrets out of the agent’s reachable filesystem.                                   │
│  - Use the strongest available model for any bot with tools or untrusted inboxes.          │
│                                                                                            │
│  Run regularly:                                                                            │
│  openclaw security audit --deep                                                            │
│  openclaw security audit --fix                                                             │
│                                                                                            │
│  Must read: https://docs.openclaw.ai/gateway/security                                      │
│                                                                                            │
├────────────────────────────────────────────────────────────────────────────────────────────╯
│
这一步是确认知晓OpenClaw是个人优先的AI助手,它有读写文件、执行命令等权限;多用户使用需额外做安全锁定。选Yes才能进入下一步配置。使用左右方向键选择Yes即可。
◆  I understand this is personal-by-default and shared/multi-user use requires lock-down. Continue?
│  ○ Yes / ● No
└- QuickStart:快速完成基础配置,后续可以用 openclaw configure 命令精细调整模型、权限等细节,适合快速上手
- Manual:手动配置,需要一步步填写所有参数,适合有经验的用户或需要定制化部署的场景
所以我们直接选择QuickStart即可
◆  Onboarding mode
│  ● QuickStart (Configure details later via openclaw configure.)
│  ○ Manual
这一步是让你选择要对接的大模型服务商,如果你现在还没有准备好API Key或本地模型环境,直接选Skip for now先跳过,后续再用openclaw configure来配置。
◆  Model/auth provider
│  ● OpenAI (Codex OAuth + API key)
│  ○ Anthropic
│  ○ Chutes
│  ○ MiniMax
│  ○ Moonshot AI (Kimi K2.5)
│  ○ Google
│  ○ xAI (Grok)
│  ○ Mistral AI
│  ○ Volcano Engine
│  ○ BytePlus
│  ○ OpenRouter
│  ○ Kilo Gateway
│  ○ Qwen
│  ○ Z.AI
│  ○ Qianfan
│  ○ Alibaba Cloud Model Studio
│  ○ Copilot
│  ○ Vercel AI Gateway
│  ○ OpenCode
│  ○ Xiaomi
│  ○ Synthetic
│  ○ Together AI
│  ○ Hugging Face
│  ○ Venice AI
│  ○ LiteLLM
│  ○ Cloudflare AI Gateway
│  ○ Custom Provider
│  ○ Ollama
│  ○ SGLang
│  ○ vLLM
│  ○ Skip for now
我选择的是智谱AI,这里选择CN即可。
◆  Z.AI auth method
│  ● Coding-Plan-Global (GLM Coding Plan Global (api.z.ai))
│  ○ Coding-Plan-CN
│  ○ Global
│  ○ CN
│  ○ Back
我这里选择Paste API key now。
- Paste API key now:直接粘贴你的智谱 API Key,OpenClaw 会明文存储在配置文件中,操作简单、开箱即用,但配置文件权限要做好,避免泄露密钥。
- Use external secret provider:用外部密钥管理工具(如Vault、1Password等)来存储API Key,更安全但配置复杂。
◆  How do you want to provide this API key?
│  ● Paste API key now (Stores the key directly in OpenClaw config)
│  ○ Use external secret provider
在这里直接粘贴API KEY即可。
◆ Enter Z.AI API key这一步是选择具体的智谱大模型。
◆  Default model
│  ○ Keep current (zai/glm-5)
│  ○ Enter model manually
│  ○ zai/glm-4.5
│  ○ zai/glm-4.5-air
│  ○ zai/glm-4.5-flash
│  ○ zai/glm-4.5v
│  ○ zai/glm-4.6
│  ○ zai/glm-4.6v
│  ○ zai/glm-4.7
│  ● zai/glm-4.7-flash (GLM-4.7 Flash · ctx 200k · reasoning)
│  ○ zai/glm-4.7-flashx
│ ○ zai/glm-5这一步是让你选择要对接的聊天渠道(比如Telegram、飞书等),如果你暂时不想配置机器人,或者想先在本地或网页端使用OpenClaw,直接选择最后的Skip for now跳过即可。
◆  Select channel (QuickStart)
│  ● Telegram (Bot API) (recommended · newcomer-friendly)
│  ○ WhatsApp (QR link)
│  ○ Discord (Bot API)
│  ○ IRC (Server + Nick)
│  ○ Google Chat (Chat API)
│  ○ Slack (Socket Mode)
│  ○ Signal (signal-cli)
│  ○ iMessage (imsg)
│  ○ LINE (Messaging API)
│  ○ Feishu/Lark (飞书)
│  ○ Nostr (NIP-04 DMs)
│  ○ Microsoft Teams (Bot Framework)
│  ○ Mattermost (plugin)
│  ○ Nextcloud Talk (self-hosted)
│  ○ Matrix (plugin)
│  ○ BlueBubbles (macOS app)
│  ○ Zalo (Bot API)
│  ○ Zalo (Personal Account)
│  ○ Synology Chat (Webhook)
│  ○ Tlon (Urbit)
│  ○ Skip for now
这一步是配置联网搜索能力,如果你暂时不需要让OpenClaw实时查资料,或者还没有对应搜索服务的API Key,直接选Skip for now跳过即可,不影响核心AI对话功能。
◆  Search provider
│  ○ Brave Search
│  ○ Gemini (Google Search)
│  ○ Grok (xAI)
│  ○ Kimi (Moonshot)
│  ○ Perplexity Search
│  ● Skip for now (Configure later with openclaw configure --section web)
这一步是配置OpenClaw的核心技能(比如文件操作、代码执行、系统管理等),选择Yes可以开启基础能力,让OpenClaw真正具备 “动手能力”,而不只是单纯对话。
◇  Configure skills now? (recommended)
│ ○ Yes / ● No这一步是让你安装各类第三方技能的依赖,这些技能大多是小众场景(比如1password、博客监控、喜马拉雅等),对核心AI对话或代码能力没有影响。直接选Skip for now跳过即可。
使用上下方向键将光标放到Skip for now上,按下空格选中,此时前面的白方框会变黑,然后按下回车键即可。
◆  Install missing skill dependencies
│  ◻ Skip for now (Continue without installing dependencies)
│  ◻ 🔐 1password
│  ◻ 📰 blogwatcher
│  ◻ 🫐 blucli
│  ◻ 📸 camsnap
│  ◻ 🧩 clawhub
│  ◻ 🛌 eightctl
│  ◻ ✨ gemini
│  ◻ 🧲 gifgrep
│  ◻ 🐙 github
│  ◻ 🎮 gog
│  ◻ 📍 goplaces
│  ◻ 📧 himalaya
│  ◻ 📦 mcporter
│  ◻ 🍌 nano-banana-pro
│  ◻ 📄 nano-pdf
│  ◻ 💎 obsidian
│  ◻ 🎤 openai-whisper
│  ◻ 💡 openhue
│  ◻ 🧿 oracle
│  ◻ 🛵 ordercli
│  ◻ 🔊 sag
│  ◻ 🌊 songsee
│  ◻ 🔊 sonoscli
│  ◻ 🧾 summarize
│  ◻ 🎬 video-frames
│  ◻ 📱 wacli
│  ◻ 🐦 xurl
└
是否为goplaces技能设置Google Places API Key,goplaces是用于地点查询、POI检索的技能,和核心的AI对话或代码场景无关。选择no即可。
◆  Set GOOGLE_PLACES_API_KEY for goplaces?
│  ● Yes / ○ No
是否为nano-banana-pro技能设置Gemini API Key,选择no即可。
◆  Set GEMINI_API_KEY for nano-banana-pro?
│  ○ Yes / ● No
是否为notion技能设置Notion API Key,该技能用于和Notion笔记工具联动。选择no即可。
◆  Set NOTION_API_KEY for notion?
│  ○ Yes / ● No
是否为openai-image-gen技能设置OpenAI API Key,该技能用于调用DALL-E生成图片。选择no即可。
◆  Set OPENAI_API_KEY for openai-image-gen?
│  ○ Yes / ● No
是否为 openai-whisper-api技能设置 OpenAI API Key,该技能用于语音转文字。选择no即可。
◆  Set OPENAI_API_KEY for openai-whisper-api?
│  ○ Yes / ● No
是否为sag技能设置ElevenLabs API Key,该技能用于语音合成。选择no即可。
◆  Set ELEVENLABS_API_KEY for sag?
│ ○ Yes / ● No这一步是配置Hooks(自动化钩子),用于在执行agent命令时触发自动化操作:比如保存会话上下文、记录命令等,属于进阶自动化功能。选择no即可。
使用上下方向键将光标放到Skip for now上,按下空格选中,此时前面的白方框会变黑,然后按下回车键即可。
◇  Hooks ──────────────────────────────────────────────────────────────────╮
│                                                                          │
│  Hooks let you automate actions when agent commands are issued.          │
│  Example: Save session context to memory when you issue /new or /reset.  │
│                                                                          │
│  Learn more: https://docs.openclaw.ai/automation/hooks                   │
│                                                                          │
├──────────────────────────────────────────────────────────────────────────╯
│
◆  Enable hooks?
│  ◻ Skip for now
│  ◻ 🚀 boot-md
│  ◻ 📎 bootstrap-extra-files
│  ◻ 📝 command-logger
│  ◻ 💾 session-memory
出现以下输出日志时代表OpenClaw配置成功。
◇  Enable hooks?
│  Skip for now
Config overwrite: /home/ninebytes/.openclaw/openclaw.json (sha256 a05765ad00e004990ef3a699668f5e8ea987a44bef8af8ebc8e7e639467a5c8b -> da553f0fc78821a0f5aab941c5272f9cc91b16722e6bc7daa82f8fb301d83982, backup=/home/ninebytes/.openclaw/openclaw.json.bak)
│
◇  Systemd ───────────────────────────────────────────────────────────────────────────────╮
│                                                                                         │
│  Systemd user services are unavailable. Skipping lingering checks and service install.  │
│                                                                                         │
├─────────────────────────────────────────────────────────────────────────────────────────╯
│
◇
Health check failed: gateway closed (1006 abnormal closure (no close frame)): no close reason
  Gateway target: ws://127.0.0.1:18789
  Source: local loopback
  Config: /home/ninebytes/.openclaw/openclaw.json
  Bind: loopback
│
◇  Health check help ────────────────────────────────╮
│                                                    │
│  Docs:                                             │
│  https://docs.openclaw.ai/gateway/health           │
│  https://docs.openclaw.ai/gateway/troubleshooting  │
│                                                    │
├────────────────────────────────────────────────────╯
│
◇  Optional apps ────────────────────────╮
│                                        │
│  Add nodes for extra features:         │
│  - macOS app (system + notifications)  │
│  - iOS app (camera/canvas)             │
│  - Android app (camera/canvas)         │
│                                        │
├────────────────────────────────────────╯
│
◇  Control UI ───────────────────────────────────────────────────────────────────────────────╮
│                                                                                            │
│  Web UI: http://127.0.0.1:18789/                                                           │
│  Web UI (with token):                                                                      │
│  http://127.0.0.1:18789/#token=************            │
│  Gateway WS: ws://127.0.0.1:18789                                                          │
│  Gateway: not detected (gateway closed (1006 abnormal closure (no close frame)): no close  │
│  reason)                                                                                   │
│  Docs: https://docs.openclaw.ai/web/control-ui                                             │
│                                                                                            │
├────────────────────────────────────────────────────────────────────────────────────────────╯
│
◇  Workspace backup ────────────────────────────────────────╮
│                                                           │
│  Back up your agent workspace.                            │
│  Docs: https://docs.openclaw.ai/concepts/agent-workspace  │
│                                                           │
├───────────────────────────────────────────────────────────╯
│
◇  Security ──────────────────────────────────────────────────────╮
│                                                                 │
│  Running agents on your computer is risky — harden your setup:  │
│  https://docs.openclaw.ai/security                              │
│                                                                 │
├─────────────────────────────────────────────────────────────────╯
│
◇  Shell completion ────────────────────────────────────────────────────────╮
│                                                                           │
│  Shell completion installed. Restart your shell or run: source ~/.bashrc  │
│                                                                           │
├───────────────────────────────────────────────────────────────────────────╯
│
◇  Dashboard ready ────────────────────────────────────────────────────────────────╮
│                                                                                  │
│  Dashboard link (with token):                                                    │
│  http://127.0.0.1:18789/#token=************  │
│  Copy/paste this URL in a browser on this machine to control OpenClaw.           │
│  No GUI detected. Open from your computer:                                       │
│  ssh -N -L 18789:127.0.0.1:18789 ninebytes@<host>                                │
│  Then open:                                                                      │
│  http://localhost:18789/                                                         │
│  http://localhost:18789/#token=************  │
│  Docs:                                                                           │
│  https://docs.openclaw.ai/gateway/remote                                         │
│  https://docs.openclaw.ai/web/control-ui                                         │
│                                                                                  │
├──────────────────────────────────────────────────────────────────────────────────╯
│
◇  Web search ───────────────────────────────────────╮
│                                                    │
│  Web search was skipped. You can enable it later:  │
│    openclaw configure --section web                │
│                                                    │
│  Docs: https://docs.openclaw.ai/tools/web          │
│                                                    │
├────────────────────────────────────────────────────╯
│
◇  What now ─────────────────────────────────────────────────────────────╮
│                                                                        │
│  What now: https://openclaw.ai/showcase ("What People Are Building").  │
│                                                                        │
├────────────────────────────────────────────────────────────────────────╯
│
└  Onboarding complete. Use the dashboard link above to control OpenClaw.
由于使用的是虚拟机,还需要用宿主机使用浏览器去访问WEB UI
用SSH隧道打通虚拟机和宿主机,实现宿主机浏览器访问OpenClaw Web UIssh -N -L 127.0.0.1:18789:127.0.0.1:18789 虚拟机用户名@虚拟机IP
注意:打通后还需要保持PowerShell窗口运行!
-N:只建立隧道,不登录
-L:本地端口转发
Windows PowerShell
版权所有(C) Microsoft Corporation。保留所有权利。

安装最新的 PowerShell,了解新功能和改进!https://aka.ms/PSWindows

PS C:\Users\NineBytes> ssh -N -L 18789:127.0.0.1:18789 ninebytes@192.168.201.11
ninebytes@192.168.201.11's password: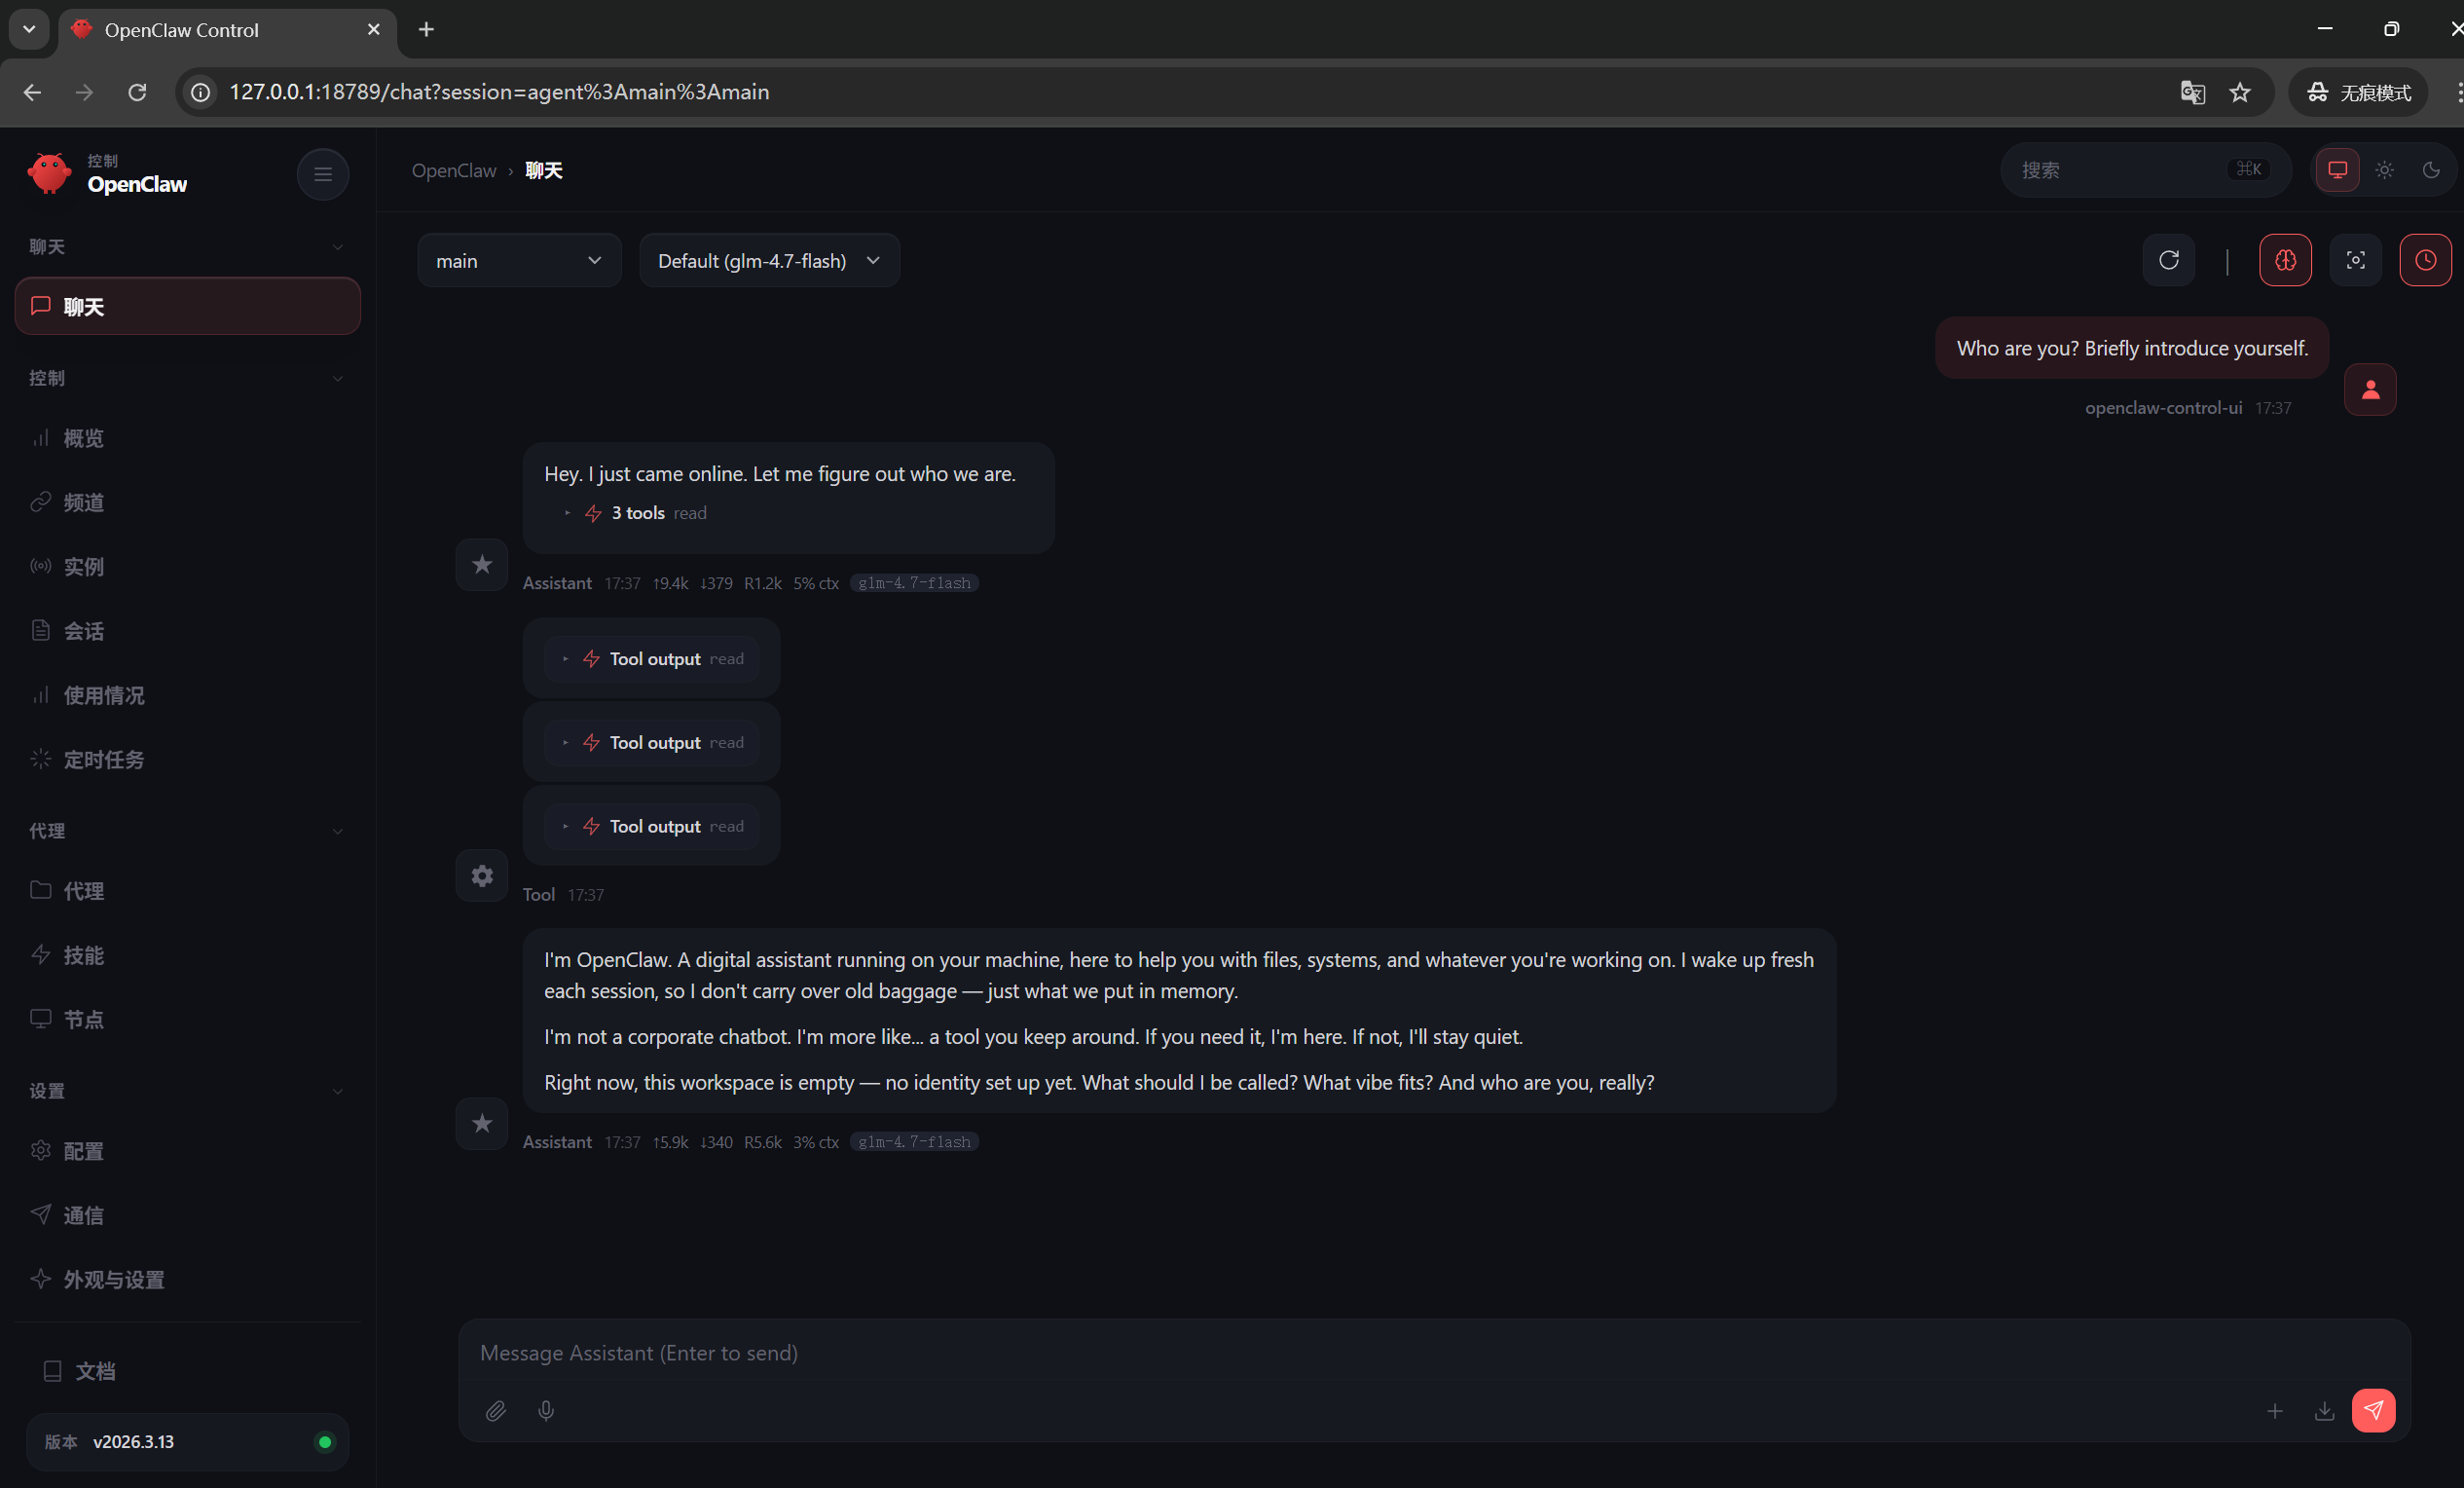
| (光标会持续闪烁)SSL隧道打通后,然后访问刚刚输出日志给出来的链接:http://127.0.0.1:18789/#token=************
实际操作时token会正常显示,我为了防止token泄露替换为了星号。
若忘记你的API KEY,可以去你的大模型供应商后台获取或者使用:cat ~/.openclaw/agents/main/agent/auth-profiles.json命令查看。
[ninebytes@localhost ~]$ cat ~/.openclaw/agents/main/agent/auth-profiles.json
{
  "version": 1,
  "profiles": {
    "zai:default": {
      "type": "api_key",
      "provider": "zai",
      "key": "af********************************LB"
    }
  }
}
至此部署完成,可以开始配置专属于你的OpenClaw了!